Showing posts with label Sewing Machine. Show all posts

Sunday, May 19, 2013

Make-it-Monday: Taking-in a Sweater at the Sides

This week's DIY went so much better than I had expected. Of course, I had a lot of Internet knowledge to draw from. I'm proud to say that I can now transform a large sweater into a small.

Here's the garment in question:


I found it (where else?) at Goodwill, and was immediately drawn to the unique neckline. It's a cross between a scoop and a V neck and it's great. 

To take it in, I first flipped it inside-out. Then, I took a shirt that fits me really well and laid it on top.


I marked the sleeves with a pen, because I knew I needed to move the sleeves in. As it originally fit, the shoulder seam was way too wide. 


Next, I marked the sides of the T.


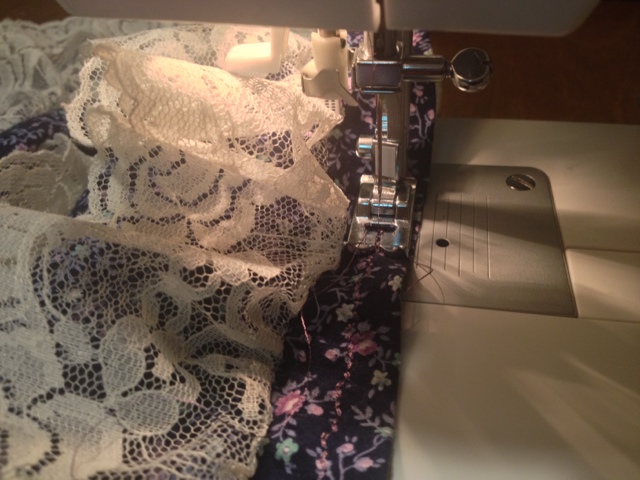
I cut the sleeves off at the seam and pinned their new location. I put the pins really far in so that I'd have plenty of room to sew the seam. I did the same with the sides, so that the fabric wouldn't shift around under the sewing machine's foot.


Then, I simply sewed-up all the seams and cut-out the extra fabric. Easy-peasy.


In all, this project took me about an hour, but that was mostly because I'd never done it before. I feel like I could do this project again in half the time.

Now I just have to wait 6 months for fall to wear my new sweater. Wahoo!


Monday, May 13, 2013

Make-it-Monday: Dealing with Failure

I saw The Great Gatsby over the weekend, though not quite as originally planned. My dress wasn't finished yet, and Roomie had a conflicting event, but that's no matter. We're going on Friday, and this time I'll be dressed for Jazz Age success.

At least that's what I'm telling myself, even though this refashion has been a nightmare.

So far, I've taken the sides in five times. I've sewn-in a complete seam, then picked it all out again. The first seams were too tight, so I sewed outside the original lines to give myself a little more room. Somehow, magically, I actually made the dress EVEN SMALLER. I literally have no idea how. I'm discovering so many new and creative ways to destroy a sewing project. 

One side got folded all over itself.

Untitled

Meanwhile, the other had two seams.

Untitled

And the zipper is always slouchy.

Untitled

No matter - I have the rest of the week to work on it (she says, knowing full well that she has no free time). 

Last night I had my first rehearsal for Joseph and the Amazing Technicolor Dreamcoat at the Atlanta Lyric Theatre, and at noon I have my first rehearsal for my summer shows at Stone Mountain. Once again, it's going to be an action-packed summer. I love being busy like this - though physically exhausting, my soul is never more energized than when I'm racing between jobs. 

Oh yeah, about the movie: I highly recommend it. But don't even bother if you're going to watch it like a film snob. It's over-the-top in the most spectacular ways - the anachronistic music, the surreal color palate, the impossible scenery. Baz Luhrmann is like a modern Busby Berkley; there's nothing realistic about the way he films. But that's the whole point. His movies aren't literal; he's not trying to give you Lincoln. It's all about getting the audience in the mood. As a director, he's much more concerned with setting a tone than with any kind of accuracy; as an audience member, I appreciate that. I want to get carried away by movies, and modern bass lines give me a more emotional connection than 20s era jazz would. All that being said, the second half of the movie settles very nicely and much of the pomp falls away (at least for a while). There are some lovely performances, too (like Tobey Maguire making his triumphant return!).

Hopefully, the second time I see it I'll be dressed in a Jazz Age frock of my own redesign. If not, I'll figure something else out. I'm nothing if not resourceful. 

Monday, May 6, 2013

Make-it-Monday: Making a Flapper Dress

I've been looking for a dress to wear to the Great Gatsby movie since January. The search is not going well. The movie opens on Friday, and I've got zip. Nada.

I did try this on recently at Plato's Closet:


And while I like the Art Deco vibe, it still doesn't fit the bill. I thought about lopping the sleeves off and making it a sheath, but then I saw the price tag, and decided my craft projects need to start with something that costs less than $20 (Also, side note, REALLY, Plato? $20 for this thing? Why?).

Luckily, I am addicted to thrift shopping, and I found some less expensive options, like this:


I've got two other options, so if I royally destroy the first two, I'll hopefully have learned enough to make the third one work. The rest of this entry shall be liveblogged as I spend the afternoon refashioning dresses.


Monday, March 4, 2013

Make-it-Monday: Hemming (No Hawing)

Hello, my lovelies! Did everyone have a good week? I missed you all, but I can see that Mandi kept you entertained while I was away - thanks, Roomie!

Sometimes, you just need a vacation. Mine was only mental (have to hold down the fort; can't go running off to the beach or anything) but it was very nice.

Since my last post, two of my favorite bloggers came through Atlanta and hosted events at Manuel's Tavern. I got to meet Deb from smitten kitchen, and Mark from Mark Reads and Watches. More on that in the days to come.

Today, we're hemming dresses. I have two purple numbers from The Clothing Warehouse that needed a little love. First up, the prairie dress.


I cut off the bottom ruffle when I wore this for opening night, but I've yet to sew a new seam. Luckily, with my machine, it took no time at all. I just wound a bobbin full of purple thread, stuck that sucker in place, and went to town.


My prairie dress is now fully wearable, with no threat of unraveling!

The other dress required a little more creativity. It's a very stretchy material (some sort of polyester blend?) so I needed a stitch that can stretch. Well wouldn't you know it, but my sewing machine comes programmed with 27 stitches - and a few of them are stretchable! I decided to take about four inches off the length, so I cut off three.


Then I folded the bottom up a half-inch, and sewed a straight seam across the bottom.


But I wasn't done. See, this darling purple garment is full of holes - big and small. I'm pretty sure some moths had dinner on this dress. I hate the look of visible patches (especially on such a busy fabric) so that was out. What saved the day was a little product called Stitch Witchery.


It's a thin, fabricy material that comes in a spool, like ribbon. When you heat it up between two pieces of fabric, it melts and creates a permanent bond. I imagine this stuff is killer for hemming. But I also hypothesized that it could also work to fill in the gaps left in some of the larger holes. And it did.

Instructions:

  1. Get two pieces of cloth wet. Place one of them in your ironing board.
  2. Lay your fabric down on top of the wet cloth. Make sure the hole is on top of the wet cloth, and that the iron won't touch ANY part of the fabric that isn't wet. 
  3. Place a piece of Stitch Witchery over the hole.
  4. Lay a same-sized piece of matching fabric on top of the Stitch Witchery. Make sure to line them up well. 
  5. Place the other wet cloth on top of the patch. 
  6. Press an iron (set to wool) atop the patch for about 10 seconds. Since this dress is rayon, I found I needed a little less time - like 6 seconds.
  7. Flip the garment over, and press the other side.


This method worked really well. I hit a few snags - the washcloths needed to be rewetted a LOT, and occasionally the iron would take some of the sheen off of the fabric (boo). But overall, it was a success, and repaired all the big holes. I won't say it was quick (overall, I spent about three hours on the project), but it was effective.


Monday, February 25, 2013

Make-it-Monday: Making a Table Runner

Guys, I'm the worst - I've had a button on the right sidebar for weeks, but I haven't yet mentioned what it's for. You know the one I'm talking about? This one?

Chantillysongs Blog hop

Click on that button, and you'll see ALL the blogs featured in the Totally Awesome Blog Hop. I'm one of them - number 83! A lucky octogenarian. Now pretend I announced this weeks ago, click on that button, and support some other blogs. Thnx.

How did y'all like the Oscars last night? I was less than impressed - especially with the opening number. Seth MacFarlane has a beautiful voice,but the structure was a mess. The meta, "your jokes suck!" thing didn't play for me at all. The boobs song? Awesome. Flight sock puppets? Perfect. But watering them down with the framing device was a boring and took the fun right out of them. If you want Seth MacFarlane to host your show, let him be an ass. If you want someone who's gonna be nice, get Hugh Jackman.

Actually, just get Hugh to do it regardless - he's a killer host. Remember this?


The Reader song gets me every. single. time.

Now, about today's craft:

Two months ago, I bought a two yards of fabric at JoAnn's. A month ago, I set up my sewing machine. Yesterday, I used the two in conjunction to create a table runner.

We have a great dining room table. My roommate's parents have loaned it to us - it was a wedding present, and functioned as their main dining table for years. Now, they're letting Roomie, Very Excellent Boyfriend and I use it while we play house. 

Domestic bliss.

I'm pretty proud of our dining area - it's small (and usually much dirtier than it is in that picture), but for the three of us (four, including Roomie's Boy Toy), it's perfect. Still, it's always felt incomplete. We've contemplated a table runner, and when I ran across this fabric, I figured I'd give it a go.


Isn't it lovely? The pattern is what sold me. When I bought it, I wasn't quite sure if it would match our design scheme, but it actually looks great. We accidentally fell into a blue/green color palate with the kitchen, and I like how it extends into the dining room. That wasn't the initial plan (we'd contemplated a purple or gold accent wall when we moved in), but it sure is nice. 


If you're going to make a table runner the way I did, here are your steps:
  1. Cut off a section of fabric about 1 inch wider than you want your table runner to be. 
  2. Iron the heck out of it. 
  3. Iron 1/2-inch seams into the sides (see, that's why you made it a little too wide)
  1. Sew down the first side seam. 
  2. Start do do the second side, and then panic because this happens:
How in the...???
  1. Get really pissed, but take a deep breath, remove the bobbin, cut away all the lose thread, and try again.
  2. Repeat steps 5 and 6 three more times. 
  3. Throw your hands in the air, storm away, eat a tortilla pizza, and drink a glass of wine.
  4. Google "what on earth is wring with my sewing machine?"
  5. Flip the bobbin around in its casing.
  1. It works!
  2. Sew second seam. 
  3. Decorate your table!
Fruit optional. And delicious.

In case y'all didn't know, sewing machines...are machines. If something simple is off, the whole thing shuts down. I have a feeling that over the next few months I'm going to learn exactly how easy it is to mess-up a sewing project. Thank goodness for the internet - otherwise I'd still be flummoxed. 

Monday, January 28, 2013

Make-it-Mondays: The Set-up 2 - This Time it's Personal

Remember last week's sewing machine disaster? Well it's a good thing I posted about it because my mom reads my blog, and she's the one who bought the sewing machine, and she was like, "No bobbins?" Because there were supposed to be some in the box. 

Here are all the other things that were supposed to be included, but were not:

  • Buttonhole Foot
  • Button Sewing Foot
  • Pack of Needles
  • Bobbins (Class 15)
  • Thread Spool Cap
  • Darning Plate
  • L-Screwdriver
  • Seam Ripper/Lint Brush
Somebody tried to play me for a fool! And this gal don't suffer fools! 

So I marched myself back to my parent's house, got the receipt, and I exchanged the crap out of it! Got myself an identical machine - one that came with everything promised by the manufacturer! 


That's how I roll!

This morning, I got that sucker locked and loaded. 


And it was hard


I'll spare you the bitter details, but it was a long and frustrating process. Curse words were slung, booklets were hurled, and lots of thread was wasted. I read the manuals, looked at the diagrams, and was totally perplexed. Finally, I turned to the only logical source: YouTube. 


Until further notice, NORDIC SINGER is my new best friend. You can all resume your lives. 

Finally, the threads looked like this, and I was ready to play. 


The machine has twenty-seven programmed stitches, so I practiced a few.


Then I rewarded myself with Supernatural

Always dignified.
Now that I can use my sewing machine, my biggest problem is deciding which project to tackle first. The table runner? Hemming the prairie dress? The world is my oyster!

And Jared Padalenemecki is the pearl.

Monday, January 21, 2013

Make-it-Monday: Setting-up

AHHH, I just realized I never published today's article! It's only 11:40 - still counts!

First of all, I want to give a shout-out to my dad, who raised me as a fan of the San Francisco 49ers. A few years ago, after a long and (heartbreaking) losing streak, Daddy defected and started rooting for New England. But I stayed true. This year, the 9ers are going to the Superbowl, and Tom Brady has to watch from home. 


Sorry, Pops. 

It's Monday, and that means it's time to make something. Today, I'm making Progress.

Christmas was almost a month ago, but my sewing machine has remained tucked away in its box. Today, I decided to conquer my fears and unpack my present. As excited as I am about it, I'm really intimidated by the threading process.

I've only used a sewing machine a few times - in a costume shop, at a friend's house, etc. Each time,  someone else had to thread the thing. Once, in college, I borrowed a friend 's handheld machine and altered a few garments. Even that miniature model was a pain to thread - it took three times as long as the stitching. 

But you can't use a sewing machine without thread, so it was time for me to conquer my fears. 


Time to peel off the packing tape and get this thing set up!


Time to read the instruction manuals, watch the included DVD, and get familiar with the various parts!


Time to realize that it didn't come with any bobbins, so I actually can't thread it today. Oops.

So, I didn't complete my intended task, but I got the machine out of the box and assembled. That's Progress for ya! 

Admittedly, this is a wimpy excuse for a "Make-it." But I do feel a bit of accomplishment for getting it out of the box. See, I have a bad habit of putting things off. I tend to say "I'll get to it," but an obscene amount of time may pass before I actually do. Especially with big projects involving technology. So this is a baby step in the right direction. 


And I'll let you know how it goes when I get some bobbins. 

And tomorrow's post won't go live at midnight. 

We good?